Thursday, December 15, 2016

CTMH Technique Blog Hop - Thrilled About Thin Cuts


Welcome to the CTMH Technique Blog Hop, this month we are featuring different uses for Thin Cuts on your craft projects, my post is in line right after Catherine's blog.


I thought I'd start with a traditional use of a thin cut on a thank you card, I made a watercolor background and then layered on the "Thanks" thin cut.  The silver glitter paper is so pretty that I added a few extra circles to give the card a bit more pop.  I couldn't just throw away the negative space that was left behind so I used that on these cards and experimented with colors behind the cut-out for different effects.


Next up on the blog hop is Kirsten, hop on over to see what she has to share with us.


Thursday, December 1, 2016

December SOTM Blog Hop - Thoughtful Flowers

This post is part of the December SOTM Blog Hop featuring artwork from the Thoughtful Flowers stamp set available through Close To My Heart.  I am in the line up right after Donna's blog


I started with a Colonial White tag then stamped a background on Glacier cardstock with one of the flower stamps and Glacier ink.  Next, I layered on some of the twine ribbon and stamped a sentiment with Smoothie ink.  For the flower, I double stamped the image, first in Fern ink on White Daisy paper and second on Smoothie paper with Smoothie ink and cut off the leaves to layer them together. For a final touch, I layered on two different color sequins.  This will be a great addition to a treat package topper.

Next up in the blog hop is Wendy, head on over to see what she has to share for artwork with us as you continue on with the blog hop.


Sunday, November 27, 2016

Flower Market Blog Hop

This post is part of the Flower Market Cricut Cartridge blog hop.  This is the newest Cricut cartridge from Close To My Heart with 700 fun images to use on your crafty projects. For this blog hop, I am following Jean's blog,


I am working on a desk calendar workshop coming up in early December so thought this would be a perfect time to break out the Flower Market Cricut cartridge and try it out.  This fun wreath is found on page 42 and cut at 4" from Topiary cardstock, then cut a bunch of pink hearts at .25" with the Real Dial Size setting.  Wrap the wreath with pink and white twine from the Adventure Ribbon Pack and add some shimmer trim (or glitter glue if you'd like) behind the leaf openings and you have a nice embellishment for your desktop calendar page. This also is an entry in the Heart 2 Heart challenge for "anything but a card."

Next up is Jacquelin, hop on over to see what she has to share with us.


Sunday, November 20, 2016

Color Dare 220 - Happy Birthday


For this week's Color Dare challenge, I made a fun birthday card with the Artbooking Cricut Cartridge.

To make this card:

  • Cut a 2.25" border found on page 66 in Colonial White and save the "honeycomb middles"
  • Sponge the border with Poppy,Saffron and New England Ivy inks.  Lay the border on the bottom portion of the card to line up the "middles" and mount those in the honeycomb pattern
  • Attach the border to the card
  • Use the thin cut for "happy" in Pomegranate paper
  • Stamp "birthday" in Pomegranate ink on Saffron paper and dovetail the end
  • Add a few clear sparkles for a little bling
Thanks for stopping by, if you'd like to check out more of what Close To My Heart has to offer, check out my website.


Tuesday, November 15, 2016

CTMH Technique Blog Hop - Ravishing Ribbon

Welcome to the CTMH Technique Blog Hop, this month we are featuring different uses for the new ribbon that's in our current catalog, my post is in line right after Catherine's blog.


For this card, I used this week's ColorDare challenge colors from the City Sidewalks paper collection. I used a 2" x 5.5" piece of City Sidewalks paper, then applied a strip of retired washi tape that I had on hand.  Next, I made a ribbon tree by folding small strips of green ribbon from the Enchantment ribbon collection for the tree then topped it with a small bow from the red ribbon.  Next, stamp the title from the D1694 - Very Merry Holiday stamp set and you've got a fun card to send out.

I'm actually last in line for this blog hop so to complete the loop if you started in the middle, hop on over to see what is on Melissa's blog for us or check out the other entries in this week's Color Dare Challenge.


Tuesday, November 1, 2016

SOTM Blog Hop - New Years Cheer

The November stamp of the month by Close To My Heart is called New Years Cheer and we have 29 consultant's participating in the blog hop, I am following Sheila in the line up.


I decided to make a 12 x 12 layout so I'm all ready to put pictures in after our annual celebration with our neighbors.  I usually start off my annual albums with a single layout ringing in the new year and like to incorporate a bit of bling to this page.  The bling here comes from silver glitter paper and silver embossing on the background section.  The Artistry Cricut cartridge has the New Years Eve title and I cut that from silver glitter paper then fussy cut an outline of Sapphire blue paper.

Supplies used:

  • Silver Glitter paper
  • Cardstock: White Daisy, Sapphire
  • Ink: Sapphire, Versamark
  • Silver embossing powder

Next up is Darlys, head on over to see what she's created for us this month.  If you don't already have a CTMH consultant, check out my website for any of these products used.


Tuesday, October 18, 2016

Color Dare 215 - Milestone Birthday


This week's Color Dare challenge came just in time for me to make a birthday card for a milestone birthday.  I started with a White Daisy card base and layered on some Pixie cardstock.  Next, I embossed a piece of White Daisy then inked the raised part with White Daisy ink and heat set it with white embossing powder.  I used the splatter technique with Cotton Candy watercolor on top of that.  The final step was to cut out the "21" that I had from a retired paper pack.

Thanks for stopping by, this was a fun card that goes out in the mail to make someone smile when she receives it.

Color Dare 215


Saturday, October 15, 2016

CTMH Technique Blog Hop - Wacky for Watercolor


Welcome to the CTMH Technique Blog Hop, this month we are featuring different watercolor techniques and my post is in line right after Catherine's blog.  I hosted a watercolor workshop recently and want to share a couple of different techniques that we used.

This first card uses the smooshing technique.  Before I got started with the watercolor, I used an archival black ink pad for the fish background.  (Normally you can ink right on top of the watercolor but I found that with the details in this stamp, it worked best to stamp first with a waterproof ink.) Next, cut a piece of a plastic page protector and dab on some different watercolors for the background; then spritz with just a little mist and smoosh it right on the card, move it around a bit to get your colors to blend nicely. Cut out the banner, stamp the title, pop it up with some foam tape and your card is ready to go.
Supplies used:

The next card is an embossed resist birthday card.


For this card, emboss your watercolor paper then carefully slide the White Daisy ink cartridge across the raised part of the paper and apply embossing powder then heat set.  Now you can break out the watercolors to fill in the rest of the card spots, use a paper towel to wipe off any color that may sit on top of the embossed area.  Add a ribbon and title to finish the card off and send to a birthday recipient.

Thanks for stopping by, next up on the blog hop is Tonya, continue on to see what she has lined up to share with us.


Wednesday, October 5, 2016

Color Dare 213 - Boss's Day Card


When this week's Color Dare challenge colors were posted, I decided to think "outside the box" of Halloween cards and then remembered that Boss's Day is coming up in mid-October so I made a card for my boss.

I don't think this picture quite does justice here, looks much nicer in person! I inked the cascading star embossing folder with Lemon ink, then cut out three of each Lagoon letter and layered them so they are raised up more on the card.  Next up was to position the black letters and to make the accent strips with the remaining colors: Raspberry, Tangerine, Emerald and Pansy.


Wednesday, September 28, 2016

Color Dare 212 - Thinking of You card


A friend of mine is going through some tough times so I thought I'd make her a card and decided to use this week's Color Dare challenge colors as the inspiration for this project.

To make this card:
  • Cut a 4.5" phone base from the Artistry Cricut cartridge from Thistle cardstock and the top layer with White Daisy (or White Glitter paper), if you use White Daisy, apply some clear glitter glue and let dry.
  • Use Pansy ink and a q-tip to apply some background lines on the phone base.
  • C1619 - So Many Smiles stamp set has the title you can stamp with in Black ink.
  • I used Eggplant paper fundamental paper for the card base
  • Assemble the phone and apply to the card
  • Finish with a few black epoxy bubbles

You can find these products on my website or check out other entries in this week's Color Dare challenge. Thanks for stopping by!


Color Dare 212

Wednesday, September 21, 2016

Color Dare 211 - Thanksgiving Card


I am getting ready to head off on a scrapbooking retreat this weekend and making Thanksgiving cards for my family members is on the "to-do" list and this week's Color Dare challenge colors were just the inspiration I needed for this project.

To make this card:

  • Cut a 2.25" leaf shape from Poppy cardstock using the image found on page 34 of the Art Philosophy Cricut Cartridge.  Run the leaf through the Woodgrain embossing folder and ink the raised portion in Poppy.
  • Cut Fern cardstock at 4" x 5.25" and run through the Striped embossing folder
  • Cut Colonial White cardstock at 3.75" x 5" and another strip at 1.5" x 5". Sponge the larger piece with Saffron and a hint of Poppy.  Use a random stamping technique to create the leaf background with Saffron ink.
  • Stamp title with Fern ink.
Color Dare 211

Thanks for stopping by, if you'd like to learn more about Close To My Heart products, visit my website.

Tuesday, September 13, 2016

Color Dare 210 - Sympathy Card


I have a card buffet coming up soon and thought this week's Color Dare challenge colors would make for a nice sympathy card option.  I started off with cutting the pocket card from the Artfully Sent Cricut Cartridge on page 37 at 5.25" so it would be the right width for a standard card.  You'll need to trim .25" off the bottom and use the corner rounder on the bottom edges.  Then cut a piece of Desert Sand paper at 4" x 5.25" and round the edges.  Use a pencil to lightly trace the flower and leave outlines onto the Desert Sand paper; use sponge daubers to apply Fern ink to the leaves and Eggplant ink to the flowers.  Mount the Colonial White pocket card on top of the sponged Desert Sand paper and stamp the title with Peacock ink.  Then to round out the card, knot a piece of our new twine with some Peacock colored floss.

Color Dare 210


Wednesday, September 7, 2016

Color Dare 209 - Happy Birthday

For this week's Color Dare challenge, I made a fun birthday card using a mix of washi tape and cardstock strips along with some sparkle from the green triangles.  The card title is from a retired stamp set called Joyful Birthday and fits nicely in between the stripes on the card. 

 Thanks for stopping by to see this week's creation.  I've got an order on the way for items from the new product catalog and can't wait to start using more of the new products to share with you.  Visit my website to check out the latest offerings from Close To My Heart.


Tuesday, August 30, 2016

Color Dare 208 - Thanks

For this week's Color Dare challenge, I used a mix of old and new Close To My Heart products to create this card that will be one of the options at an upcoming Card Buffet workshop I'm holding to celebrate National Stamping month that's coming up in September.  I started by embossing a card front with the Quatrefoil embossing folder and used seam binding ribbon for added texture.  Next I cut out the title pieces using the Artiste Cricut Cartridge design found on page 65 in both White Daisy and Lagoon paper and stamped the title in Lagoon ink. Next up was to cut the flower vase from Juniper paper using the design on page 54 of the Art Philosophy Cricut Cartridge and I stamped the vase in Juniper ink with a distresssed background stamp and Juniper pigment ink then applied clear embossing powder and heat set it for some shine.

I stamped flowers in Thistle and Pixie ink using stamps from "Have a Happy Day" and "Beloved Bouquet" stamp sets on scrap White Daisy paper then fussy cut them out.  I mounted everything on the card front then used the new shimmer pen to add sparkle to the flowers.


Color Dare 208
Thanks for stopping by, you can check out lots of great products from Close To My Heart to create your own craft projects on my website.

Monday, August 22, 2016

Color Dare 207 - Hello Card


For this week's Color Dare challenge, the yellows reminded me of sunshine so I just had to incorporate a sun on my card for this week.  This card has a mix of retired and new products. I started with a basic card and cut the corners then used a hole punch to make the whole thing look like a giant tag.  Next, I cut my "sunshine" shape at 3.25" on Canary cardstock using the element on page 77 of the Artiste Cricut Cartridge.  Then I cut out Hello using Saffron fundamentals paper with one of the new thin cuts.  Next, cut short strips and dovetail them in White Daisy, Canary, Saffron fundamentals and a piece of leftover Canary patterned paper from the Kaleidoscope paper packet.  I used the new Happy Thoughts embossing folder and embossed "Hello" on the White Daisy strip.  Final touch is a strip of gold shimmer trim and the card is ready to write in and mail out!

Color Dare 207
Check out my CTMH website to see the new products available in the annual expressions catalog. Here are the items I used on this project:
product image
Happy Thoughts Embossing Folder
product image
Hello Thanks Thin Cuts

Sunday, August 14, 2016

Color Dare 206 - Awesome card


For this week's Color Dare challenge, I made some cards for my team at work.  We just completed a project and I like to give everyone a handmade card to recognize the hard work they put into our projects. I needed a masculine card option so came up with this design:


Supplies used:

Paper: Peacock and Saffron patterned paper from the Urban packet along with Poppy and Whisper card stock
Embossing Folder: Cascading stars
Ink: Peacock and Flaxen
Stamp set: C1644 - Beyond Awesome
Embellishment: Whisper and White twine

I have to confess I didn't read close enough and did use a piece of White Daisy but won't have time to re-do this and figured I'd go ahead and post it anyway.  Thanks for stopping by!

Color Dare 206

Tuesday, August 9, 2016

Color Dare 205 - Anniversary Swing Card

For this week's Color Dare challenge, I have another anniversary card to share. For this card, I cut the Heart scene card at 5.5" from the Artfully Sent Cricut cartridge found on page 35.  Then I mounted Eggplant patterned paper on the left front part of the swing card and trimmed out the heart opening. On the inside of the card, I used Crystal Blue paper and used my border punch across the bottom edge for some visual interest.  I backed the heart with Thistle and added the White Daisy elements left on my Cricut mat on the back side.  The final element is the Juniper heart stamped with a sentiment from the Happy to Be Friends stamp set with Eggplant ink.   Here's the final product:


When you swing the card open, it looks like this:


Color Dare 20
5

Monday, July 25, 2016

Color Dare 203 - Anniversary Card


For this week's Color Dare challenge, I decided to make an anniversary card using inspiration from Lisa's blog hop post back in 2014, isn't the internet a wonderful way to connect ideas together?!?  For this card, I cut the Love pocket card at 5" from the Artfully Sent Cricut cartridge found on page 35.  Then I mounted that on top of the Crystal Blue paper from the retired Blossom paper packet.  From the Happy to Be Friends stamp set, I stamped the title  with Crystal Blue ink, stamped flowers on a scrap piece of White Daisy paper in Sorbet ink and fussy cut those out.  Next for the finishing touches, a bow in Canary yellow ribbon that I had on hand and a couple of gems in the flower centers.


This was a lot of fun to make and I cut out a whole page of the Love pocket cards so will experiment with more colors and embellishments on future versions.

Wednesday, July 13, 2016

Color Dare 201 - Magical Birthday


This week's Color Dare challenge is based on the Magical paper pack colors so what better type of card to make than one for a "Magical" birthday! I started with a White Daisy card as my base, then cut this fun birthday greeting from the Artfully Sent Cricut Cartridge on Crystal Blue card stock and backed it with Cranberry, Honey, Sapphire and Whisper paper scraps.  Final touch was to outline the card with my black marker and a little leftover embellishment.  I stamped my birthday sentiment inside and it's ready to go!


You can find the supplies used for this card on my Close To My Heart website through the end of July when the current catalog expires.  If you don't already have a consultant and want extra incentive to place an order, I am offering a 10% off coupon good for your next order for any orders placed on my website now through July 30, 2016.  Happy shopping!
Color Dare 201

Tuesday, July 5, 2016

Color Dare 200 - Thank You


For this week's Color Dare, there is a prize drawing and I just completed all my comments on the design team member blogs, they shared some really fun projects and that helped me get inspired to spend a little time in my craft room to enter my own creation this week.

I went with a tone on tone style for the Colonial White background using some strips that were left from a Cricut overlay I used on a project a while back.  Then I cut out a frame to add a bit of depth.  A quick cut of a flower from the Art Philosophy Cricut cartridge to match a flower from the C1599 Pretty Petals Flair stamp set that I inked in Rudy.  Next I stamped the flower center and fussy cut it out.  Finally, I stamped the Thank You title in Sapphire ink to finish it off.


Wednesday, June 22, 2016

Color Dare 198 - You are Awesome

Color Dare 198

I am off to the airport for the Close To My Heart Convention and was inspired by this week's color dare challenge to make cards for my roommates.  This was a fun color combination to work with and I just love the sayings on the Beyond Awesome stamp set!

I used a banner from the Artistry Cricut cartridge to make the layers and then did some random stamping to make my background paper and finished it off with some Sweet Leaf green sequins.

Tuesday, June 14, 2016

Color Dare 197 - Swing Card


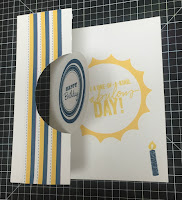
For this week's Color Dare #197 challenge, I'm giving another sneak peek at a swap card I'm making for the upcoming CTMH convention.  This is my first try at making a swing card, from the Artiste Cricut Collection. The hardest part was cutting all the little strips for the front part of the card! Note: the Artiste Cricut set is retiring soon, you can still get your copy from my CTMH website while supplies last. 


And here's what it looks like opened up: 


Now about those strips for the front part....with this color challenge, we were limited to using Pacifica, Canary and White Daisy.  I had some of the Confetti Wishes paper in my stash, notice how there are purples in there and that the strips are on a diagonal?  That's where it got a bit challenging but if you turn the paper to cut off a triangle on a corner, then you can cut out straight line strips in the colors you need.  (And you never know when those purple strips that are left over will show up!) 


Card instructions: 
  • Cut these shapes from the Artiste Cricut Collection; card shape on page 53 at 5.5" and circles on page 48 at 1.75" & 2.5" in White Daisy, 2" circle in Pacifica, star circle from page 77 at 3.25" in Canary
  • Use stamp set D1560 - Holiday Tag Occasions for the title on the front; ink with Pacifica
  • Use the candle that is included with the Artiste stamp sets and ink on the card base with Canary and Pacifica
  • For the sentiment inside, use your favorite saying, I found one from a retired Operation Smile stamp set that worked nicely.


Related Posts Plugin for WordPress, Blogger...